CapnBry
-
Posts
24 -
Joined
-
Last visited
-
Days Won
3
About CapnBry

-
Interesting data from OpenEVSE - FFH charging overhead
CapnBry replied to gladeplugin's topic in Batteries & Charging
I don't use value charging, so maybe that has something to do with it, but when my FFE is done charging the charger turns off completely (OpenEVSE reports 0A). Here's a charge of about half a battery's worth from my OpenEVSE -> OpenWRT monitor -> MQTT -> Node:RED -> EmonCMS (wow that's a lot of steps!) I know if I go open the door and step on the brakes, the charger clicks on and pulls about 0.4A like you say. That ends in a couple minutes after I leave the car. Interesting that it clicks on so early before the value charge. -
I should clarify that I think it's working just fine. My back was warm because it was hot out and there is no cooling in the seat back. I'll provide my information if I can provide any further useful tidbits, but unless the seat back is supposed to be cooled as well I'm perfectly happy with the results.
-
 Rexracer reacted to a post in a topic:
Cooled Seats Option Complaint
Rexracer reacted to a post in a topic:
Cooled Seats Option Complaint
-
I was riding home today in 90+ degree Tampa heat and I said "I swear my back is getting HOT". To take subjectivity out of it I ran a test. The whistlepig (my Fusion) was fully charged and in a 31.5C ambient garage for 3 hours. I turned on the car and seat coolers and made sure the A/C vents were pointed away from the seats (although I probably should have turned it off), closed the doors, and let it run for 15 minutes with nobody in the seat. The seat back does get warm from the cooler but not as hot as I thought it felt: It does get pretty hot in the back, I saw temps over 45C at one point so maybe there's a chance that while sitting in the seat it can push against the thermoelectric module somehow? I tried sitting in it for a couple minutes after the test and didn't feel any noticeable heat in my back. The FLIR also showed a pretty even heat distribution when I got up.
-
Hybridbear reacted to a post in a topic:
OBD: Tire Pressures and Oil Life
-
This is great! I wondered if the TPMS status was available but didn't know where to look. I entered them into Android Torque and it worked like a champ. The values matched my digital tire pressure gauge within its 0.5PSI precision. This will certainly be helpful in providing a quick glance reading of all the tire pressure without having to go around with the pressure gauge. For those wondering what goes where in Torque, the Mode and PID go in the first field in Torque (squashed together) then the TP Hdr. goes into the OBD Header field in Torque. Thanks so much for posting this!
- 1 reply
-
- 1
-
-
Rhynri reacted to a post in a topic:
240v Charger Installation Options and Cost
-
240v Charger Installation Options and Cost
CapnBry replied to Rhynri's topic in Batteries & Charging
It is a GL.iNET Smart Router, but anything that runs OpenWrt will do. I used the GL.iNET because it has headers for +5V input, RX/TX and a few of the other GPIOs and I was hoping I could use them to be able to update the OpenEVSE firmware and not need any other components. I couldn't get it to work for software reasons though. A hootoo HM-TM02 also would work in this configuration but requires a bit more setup to get going. Basically it is just the GL.iNET router -> USB Serial cable -> OpenEVSE with my luci-app-openevse package. There's more information in the OpenEVSE group about what I did: https://groups.google.com/forum/#!category-topic/openevse/F7tWYQUucUc -
Hybridbear reacted to a post in a topic:
240v Charger Installation Options and Cost
-
240v Charger Installation Options and Cost
CapnBry replied to Rhynri's topic in Batteries & Charging
Yeah it is outside the box. The router is tiny but there's just not enough space inside the box to fit it in a place where I would be comfortable it wouldn't possibly interfere with the charger's function. It might be possible to take it apart and fit it that way but I just slapped it on top. And 3D printed a cover that also has some indents for the cord to hang in so it looks like it has a purpose other than hiding a box inside of it. -
larryh reacted to a post in a topic:
240v Charger Installation Options and Cost
-
Hybridbear reacted to a post in a topic:
240v Charger Installation Options and Cost
-
240v Charger Installation Options and Cost
CapnBry replied to Rhynri's topic in Batteries & Charging
The quality of the components is top notch and there's not much to assemble beyond soldering something like 8 leads, putting in some screws, and putting the wire in. There are some wiring bits to assemble with crimp connectors, solder, and heatshrink, and it doesn't take too long but that's the most tedious part to go through. All the holes are predrilled and ready to go. The powdercoat on the box is really nice and professional looking, although the logo doesn't look like it will last. The most difficult part for me was running 6 gauge wire into the box and getting the wires into the contactor screw terminals. The bends are a little tight for such thick wire. If I did it again I'd probably go with 30A (24A continuous) wiring instead just because the wire is so much easier to work with. I probably spent about two hours putting the box together and another 1.5-2 just trying to get the power cable wired. The J1772 cable (a 50A ultra flexible) was a dream to install by comparison because it had two lighter gauge wires instead of one mondo one. The beauty of the OpenEVSE really shines because I connected a $26 wifi router to it with a $4 cable and now it has a web site too. -
meyersnole reacted to a post in a topic:
240v Charger Installation Options and Cost
-
Hybridbear reacted to a post in a topic:
240v Charger Installation Options and Cost
-
HotLap reacted to a post in a topic:
Thule Traverse AreoBlade Roof Rack System
-
Thule Traverse AreoBlade Roof Rack System
CapnBry replied to HotLap's topic in Cargo, Hauling, Roof Racks & Towing
Excellent! I agree, I couldn't figure out which set of instructions to follow. There was a lot of overlap but details from one weren't in the other. When you get down to it though, they're not very complicated so once you figure it out it is easy (unless you put one of the feet on backward like I did). I had to go look at my racks to see if I could figure out what latch you were talking about. Do you mean the latch on the back, as in the inboard side? Isn't that the latch that locks the bar to the foot? I think the "rapid" part is the screw toggle tools. -
HotLap reacted to a post in a topic:
Thule Traverse AreoBlade Roof Rack System
-
240v Charger Installation Options and Cost
CapnBry replied to Rhynri's topic in Batteries & Charging
I bought one of their latest kits, the 50A v3 with the powdercoated aluminum enclosure. It includes the current measurement and LCD and everything and was $475 shipped with a 20ft 40A flexible cord. I considered sourcing all the parts myself because I regularly place orders with electronic components places like digikey and mouser but I am glad I bought their kit so I didn't have to figure out how to make an enclosure or buy a bunch of screws or anything. It is smaller than I expected it to be too, like less than half the size of most the big commercial units and does 50A (40A continuous)! Even if the Energi only takes 14A I figure it is worth a little more to have room to grow. EDIT: More photos on my Google+ https://plus.google.com/115791887386052258127/posts/gS5WNybA4zL -
Thule Traverse AreoBlade Roof Rack System
CapnBry replied to HotLap's topic in Cargo, Hauling, Roof Racks & Towing
I will agree the instructions are worse than IKEA instructions. It has a line drawing of a something with an arrow pointing to another something. Sometimes there will be a number there too. I think I watched a youtube video that made it a bit more clear about what you're supposed to do and still I was a bit skeptical. 2) You need to undo the bolt to add/remove the racks from the car. There isn't any sort of one-motion pop on latch, but with the tool right in the bolt all the time you can just lift the lid, pull out the tool and remove the bolt in no time. The latches (I assume that means the large part that comes up from under) flap all the way down to install then use the bolt to pull them up to the car. 3) I had the same issue when I first put it together. The instructions aren't clear about this but you have to do something to the them to slip up and over and they sit completely under a second tab lip when assembled correctly. When I first tried it I had them sitting on the darker gray flanged piece but they actually snap up to the lighter gray piece that has more contact area with it. It is hard to take a picture of but here is one of mine. 4) My snaps stay in place just fine so far, maybe I just got lucky. It doesn't take much force for them to pop open though, -
Thule Traverse AreoBlade Roof Rack System
CapnBry replied to HotLap's topic in Cargo, Hauling, Roof Racks & Towing
They go on and off really easily. I have a tape mark inside the door frame that tells me where they mount so I just open the doors, lift the bar onto the car, and crank it down. There are little toggles inside the racks that pop out that you just screw down to lock them in place. Takes 1-2 minutes per bar and leaves nothing behind when they come off. I'll put it on and get some better pictures this weekend. -
Thule Traverse AreoBlade Roof Rack System
CapnBry replied to HotLap's topic in Cargo, Hauling, Roof Racks & Towing
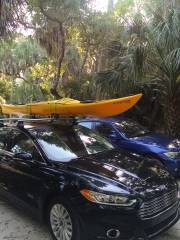
Oops sorry I disappeared for a bit. My racks didn't include the locks. $60 for 4 lock cores seemed a bit steep considering they're probably still able to be defeated by thieves. I just take the racks off when they're not in use. Granted, they are probably most likely to be stolen while I am out kayaking! I only have this one picture, but my kayak is a sit in 14'6" model that weighs 55lbs.The length isn't a problem. In fact I almost forget it is up there because I can't see it through the windshield unless I lean forward. Everything was purchased during a thule sale from rackattack.com -
-
-
I've had my Energi for 7 months now and was only on my third tank of gas when I went on a long drive this Thanksgiving break. The fuel usage in the trip odometer has always read low when I filled up the tank but I attributed that to the fact that I was usually using such a small amount of gas at a time that the rounding errors would add up a significant difference. However, on the latest trip I was driving at least 200 miles in EV Later so the ICE was on all the time. I filled up completely and ran it down until the range had been at 0 for at least 10 miles. Both times the trip odometer reported 12.2-12.5 gallons used but filling the tank I'd put ~13.5 back in there. Anyone else notice the trip odometer doesn't keep accurate track of the fuel usage? That means that the stated MPG would also be higher than accurate as well. EDIT: For those wondering, the trip meter indicated an average of 39.4 MPG driving at 73 MPH with the A/C on most of the time. My calculations put it closer to 36.5 MPG.
-
Thule Traverse AreoBlade Roof Rack System
CapnBry replied to HotLap's topic in Cargo, Hauling, Roof Racks & Towing
I purchased pretty much the exact same thing back in May. -- ARB53 53" AeroBlade Load Bars -- 480R Rapid Traverse -- Fit Kit 1692 -- 881 Top Deck Kayak Carrier -- $455.80 shipped They fit great, look slick, and go on and off in about 3 minutes thanks to the twisty latches. I have no complaints other than the cost. I did complain about the fit initially but then I realized I had put one of the fit kit rubber pieces on backwards. I put a small piece of pinstripe sticker inside of the door frame to indicate where they should be so I won't have to measure every time I want to install them. With the sunroof open and the racks installed, the wind noise is significantly increased because I think the bar directs air right into the sunroof. However with the car all closed up I can't tell the difference. If I had to do it again, I'd buy the same thing-- paying extra for the aeroblades vs the standard square tubular steel.